Affiliates
Aura Temple :: Blue Parade :: Clover's Pokemon Village :: Eevee Valley :: Electric Pokemon :: Famille Darcangel :: Firechao :: Floatzel.Net :: Flygon Hollow :: Galladia :: Glaceon Palace :: Guarded Dreams :: Hoshiko Designs :: Lucario's Lair :: Piplup Princess :: Poke Gems :: PokeUnit :: Pokemon Nights :: Pokemon Pwns :: Poke Review :: Rain Sonata :: Shadow Pokes :: Simplicity Designs :: Swalot's Avenue :: The Frontier :: The Pokemon League :: The Pokemon Oasis :: The Sky Pillar :: Umbreon's Shadow Island :: United Universe :: XxPokemonGiveawaysxX :: Zoroark-netii ::How to make a Vortex Effect on GIMP
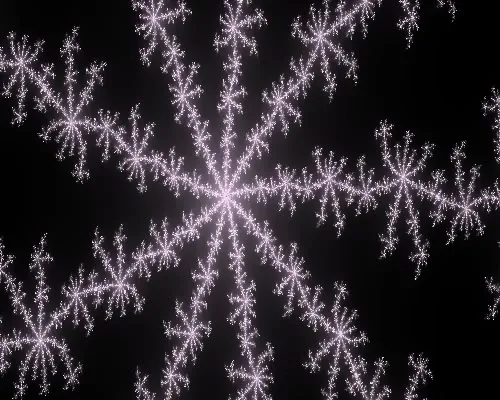
Hi there!~ This tutorial here will teach you how to make the vortex effect on the program GIMP! I was just experimenting one day when I found this, so now I'm going to share this tutorial with you so you know how to make a vortex on GIMP as well! The vortex effect is awesome for graphics, such as banners, avatar bases, buttons, splashes, etc. They also make great background textures for stuff! :DAnyway, in this tutorial, you're going to learn to make this: (click the image below for a larger size)

See? Isn't it awesome?~ <3 Well just continue below to learn more about making one!~ :D
what you need
- The program GIMP (download it for free at gimp.org).
- This tutorial you're reading right now!
instructions
1. Firstly, load up GIMP. ^_^
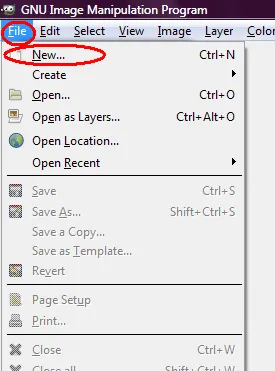
2. Secondly, you see those tabs up near the top of the GIMP screen? Click on the 'File' tab, (its near the top-left corner of the screen!~) and choose the 'New' option.
3. Now, after clicking 'New', a pop-up window should pop-up. It should look a bit like the one below... anyway, set the size of the canvas (the amount of space you'll be able to work on afterwards ^_^';). 800 width and 200 height is good for a banner,
but in this tutorial, I'm going with 500 width and 400 height. Click 'OK'. The canvas should now be a white rectangular/square. (or something else, depending on what size you set the canvas)

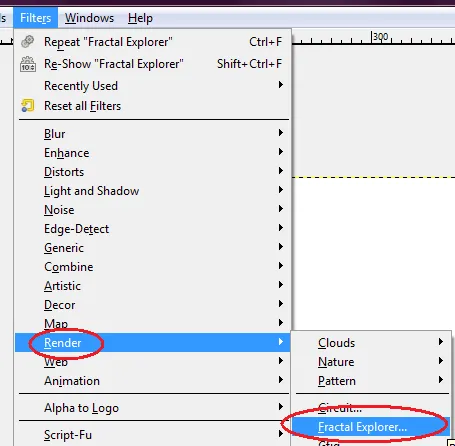
4. Go ahead and click on the 'Filters' tab near the top of the screen. Hover your mouse pointer down to 'Render', and then 'Fractal Explorer'. Click on Fractal Explorer. =D
5. After clicking 'Fractal Explorer', a new pop-up window should pop-up. It looks like the one below. ^_^
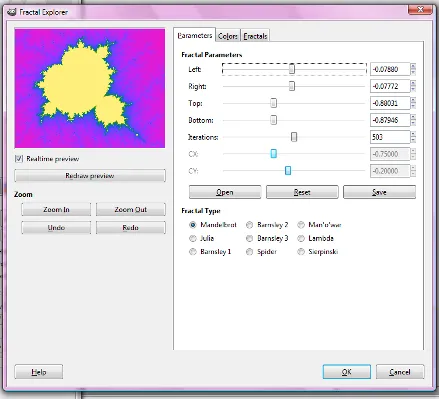
6. Now, on the new pop-up Fractal Explorer window, there's 3 tabs up near the top of the pop-up window. They from left-to-right as "Parameters", "Colors", and "Fractals". Go ahead and click the "Fractals" tab.

7. After clicking the 'Fractals' tab, the window's appearance should change to look like the one below. There's a list of weird sounding names. Choose "Ice_Crystal", and then click "Apply", and then "OK". ^_^

8. Now, after clicking 'OK' on the 'Fractal Explorer' while on the 'Fractals' tab, your canvas should now look like the one below:
9. YAYY!~ XD So now we've went through all this way!~ We're just a few steps away from achieving an awesome vortex effect!~ :3 So anyway, on with the tutorial! Click the 'Filters' tab near the top of the GIMP screen. This time move your mouse over 'Blur',
and then click 'Motion Blur'.
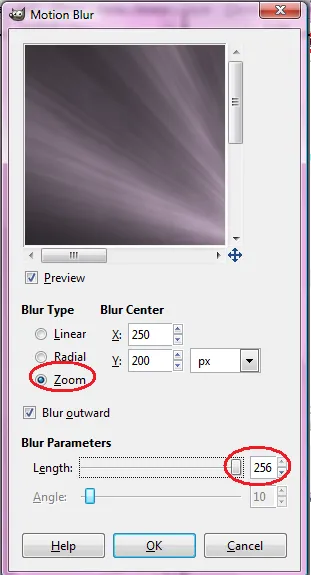
10. A little window should pop-up. It looks like the one below. Just set the blur mode to "Zoom", and drag the "Length" slider up to 256, or the maximum it can go. :D Then click OK!~ (Note: Sometimes GIMP may appear to crash, but its just loading. ^^;
Sometimes it can take up to a few minutes to complete loading, so just be patient!~ :D)
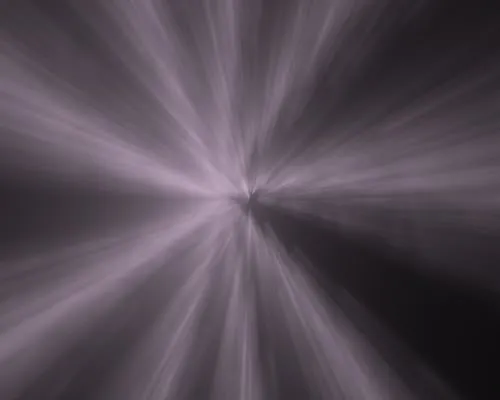
11. After GIMP has finished loading, your canvas should look something like this:
12. Now time to add some color!~ Now some of you who have read the Colorize tutorial, will know what I'm talking about, but anyway, I'll just explain
again. ^^ Click on the 'Colors' tab, (near the top of the GIMP screen), and then click "Colorize". Then fiddle with the sliders and switchers until you find something that
you like! Here's my result below! (Note: If you don't understand what I'm talking about, just read the Colorize tutorial. ^^)
Conclusion
I hope you successfully learnt how to make a vortex effect with this tutorial. ^_^ I hope you enjoyed reading this tutorial and that you will be able to create super awesome pretty vortexes. :D If you're confused or need help with anything in this tutorial, just send me an email at wishjiirachii@gmail.com, and I'll be happy to help! ^_^
Shoutbox
Credits go to Umbreon's Palace for the Shoutbox smilies.Pokemon
Rants and Opinions
Pokemon TM/HM List
PKMN FR/LG Review
PKMN Yellow Review
PKMN G/S Review
Pokemon Moveset Guide
Find Cherrim
Designs
Graphics
Icon Bases
Banners
Banner Bases
Forum Signatures
Link Buttons
Wallpapers
Textures
Project Metagraphic
Resource Packages
Misc.
Requests
Tutorials
Other
Credits/Thanks
Color Chart
Fanfictions
All works, graphics, content, and designs from Kasumi are licensed under the Creative Commons 3.0 Licence.
